- Windows 8.1, 10
- Code::Blocks v13.12 - v16.01 with MingGW Setup
- wxWidgets v3.0.3, v3.0.4
wxWidgets also allows commercial uses of the products built with it. And furthermore, MingGW and wxWidgets come by free of charge , so that those who have great zeal for programming but cannot afford a commercial one could delve into programming right away.
Finally, both of them support multi-platforms!
-
Run Code::Blocks :
A Compiler auto detection dialog box appears >> Select GNU GCC Compiler >> Click [Set as default] >> [OK] :

- Choose [File] >> [New] >> [Project] >> [wxWidgets Project] >> [Go].
A Guide dialog box appears : [Next] >> [wxWidgets 3.0.x].Project title : Lukit <<-- User-preferred project name here.
Folder to create project in : Browse for folders then create and select appropriate one for the project. Then the rest fields are filled out automatically :

Fill out the author information if seen fit in the Project Details dialog box.
[Next] -
Preferred GUI Builder : None.
Application Type : Frame Based.
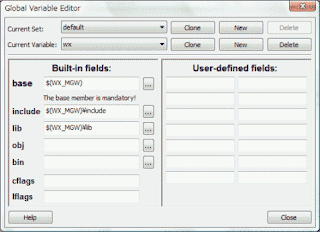
[Next] >> Specify wxWidgets location :$(WX_MGW)[Next] >> Global Variable Editor appears :
For Built-in fields:
- base : $(WX_MGW)
- include : $(WX_MGW)\include
- lib : $(WX_MGW)\lib

[Close] - base : $(WX_MGW)
-
Compiler and build configuration >> [Next] with default values.
Nothing to edit here :

-
In the Various Configuration :
- Check >> Enabled unicode.
- Check >> Create and use precompiled header(PCH).
- Check >> Configure Advanced Options.
[Next] -
Advanced Options :
- Check >> Use __WXDEBUG__ and Debug wxWidgets lib.
- Check >> GUI Mode Application for both of the Debug and Release Target fields.
[Next] -
Select additional libraries desired :

[Finish] -
Additional settings should be set before delving
into writing code :
[Project] >> [Build Options...]
Click on the project name on the left pane :
Click [Compiler settings] tab
-
Click [Other compiler options] tab >>
-pipe
-mthreads
-Winvalid-pch
-include wx_pch.h
Add : -std=gnu++11 or some other appropriate one.
-
Click [#defines] tab >>
- Lukit :
The following would be already there. If not, add any missing one :
__GNUWIN32__
__WXMSW__
wxUSE_UNICODE
WX_PRECOMPAdditionally, add the following :
wxUSE_GUI=1 - Debug :
__WXDEBUG__ - Release :
wxDEBUG_LEVEL=0
- Lukit :
Click [Linker settings] tab and make sure <Link libraries> settings are similar to the following configurations respectively for each one :
- Lukit :

- Debug :

- Release :

Click [Search directories] and check if they are set as follows :- [Compiler] tab :
- Lukit :

- Debug :

- Release :

- Lukit :
- [Linker] tab :
- Both Debug, and Release configuration are as follows :

- Both Debug, and Release configuration are as follows :
[Resource Compiler] settings may well be the same as that of [Compiler]'s. -
Click [Other compiler options] tab >>
[File] >> [Save Everything]
Done project settings configuration!
- Basic code for skeleton window is already there :

[Build] menu >> [Build] menu item >> The project will be built without errors.
[Build] menu >> [Run] menu item >> The project will be run as follows :


Now try building it for release and compare the size of the two versions of the project's executable files.
EOD
No comments:
Post a Comment