Warning : Disk partitioning operations should be performed with a great care as a little mistake could lead to blowing up the whole data on the target disk! You(the reader of this article) have been warned!
Previously, we've created a live GParted USB stick for disk partitioning. Now it's time to utilize it to erase all partitions along with their data from a 1 TB(Terra Bytes) hard disk. As all the data in the drive is being erased the current existing data should be backed up to some other disks or storage devices before proceeding with this article.
And here do we create a UEFI system with a GPT partition table for future extensibilities rather than the now almost being deprecated and limited MBR kind.
Prerequisites :
- GParted Live USB Stick

- 1TB hard disk
- UEFI-available main board
GPT Partition Scheme :
The partition table for a 1TB hard disk to be created from now on is as follows:
| Order | Type | Kind | File System | Size (GB) | Reigning OS |
| 1 | EFI System (boot, esp) | Primary | FAT32 | 1 | * |
| 2 | Normal | Primary | NTFS | 160 | Windows OS |
| 3 | Normal | Primary | NTFS | 570 | Windows Data |
| 4 | Normal | Primary | ext4 | 96 | Linux OS |
| 5 | Normal | Primary | ext4 | 104 | Linux Data |
Specifics :
We discard(ignore) all the data in the target hard disk while creating a new GPT partition scheme from scratch for a fresh new start with a better disk layout. Thus it does not matter whether the current partition is of MBR or GPT.
Then now let's delve into it!
-
Turn on the PC or reboot it if currently running.
-
Enter BIOS setup screen by pressing [Del] or other appropriate key for the task when the boot screen message appears.
-
Now check if the UEFI boot option is enabled and whether it is set as the primary in sequence for booting. The following screen shows that both the UEFI(GPT) and legacy BIOS(MBR) booting are enabled :

- Now connect the GParted USB stick to the PC then reboot the PC.

- Bring up the boot device selection menu screen by pressing a specific key accordingly to the user's main board ([F12] is the key for Gigabyte main board, for example) right on booting :

Then choose the previously created GParted USB stick as shown above with EFI labeled one.
- Then the following GParted boot screen appears :

Just press [Enter] to boot with default settings. - There's no need to change the key map usually. Just press [Enter] to proceed when its kemap choice dialog appears.
- Press arrows keys to move across listed language items to choose the language for the keyboard when language choice dialog screen appears scrolled up. 33: US English is OK in most cases.
- Press [Enter] again for graphical user-interface of GParted :

- At last, the GParted GUI application appears on screen displaying the layout of the current hard disk drive :

If there were only 1 primary hard disk attached to the system, the device name token displayed would be different from those shown in the image above ( eg)/dev/sdb1, /dev/sdb2, /dev/sdb.... ). In that case those will be presented as follows ( eg)/dev/sda1, /dev/sda2, /dev/sda....) :Anyway, the a, b, c, d... notation following ...sd.. means the drive order as the alphabet connotes it. That is, ..a is the 1st drive, ...b is the 2nd and ,..c is the 3rd...
Then we could understand the numbers followed means what: The partition table order.In short, from the above image do we get to know that the current system shown above has at least two physical disks and the secondary drive (1 TB) of them are chosen for partitioning, which currently has five partitions all told as shown above.
- First of all, the correct target hard disk should be selected for partitioning :

- Second of all, all the current partitions should be deleted : Firstly, select the last partition and delete it ( GParted -> Partition -> Delete ).
-
And repeat that for all other remaining 4 partitions until all space on the disk falls in an unallocated state :

- All the tasks that have been done up until now should be actually applied to the disk to proceed to the next step.
Click [Apply] to do that :

- Now that the disk has become empty we could create a GPT partition table anew :
[Device -> Create Partition Table...] - Choose gpt from [Select new partition table type] field.

-
A new GPT partition table has been created. It is time to create partitions on the table.
The foremost one that should be created before any is EFI system partition which also plays an important role like a boot strap on a bootable main hard disk in legacy BIOS systems. With this EFI partition could we install various Operating Systems and easily choose one from which to boot the system. - Choose [Partition -> New] from GParted.
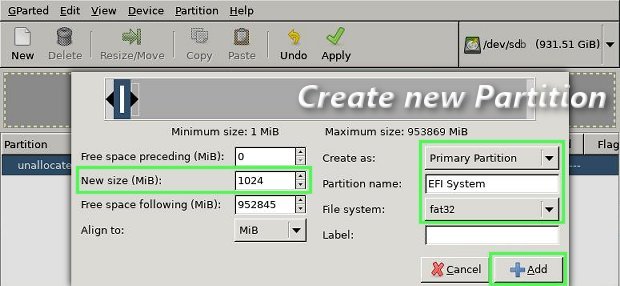
- Input 1024 in the [New size (MiB)] field for 1 Giga-byte EFI partition, which is to be Created as : Primary Partition with FAT32 File system.

- Now that the first system partition has been created, now add a new NTFS partition for Windows OS accommodation in the unallocated space :

Input 163840 in the [New size (MiB)] field for 160 Giga-bytes NTFS partition, which is to be Created as : Primary Partition with ntfs File system.

- Next, input 584202 in the [New size (MiB)] field for 570 Giga-bytes NTFS partition, which is to be Created as : Primary Partition with ntfs File system.

- Now, input 98304 in the [New size (MiB)] field for 96 Giga-bytes Linux partition, which is to be Created as : Primary Partition with ext4 File system.

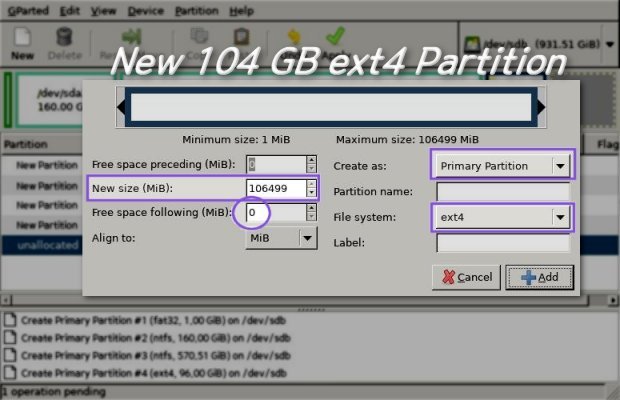
- Finally, input the size of all the remaining space 106499 in the [New size (MiB)] field for 104 Giga-bytes Linux partition, which is to be Created as : Primary Partition with ext4 File system.

- Input 1024 in the [New size (MiB)] field for 1 Giga-byte EFI partition, which is to be Created as : Primary Partition with FAT32 File system.
- Done! All the partitions have been created.
Click [Apply] again to save all the tasks done up until now :

Click [Apply] on the following confirming message box to save all the changes :

When the following completion message box click Close to finish :

- Now deal with the most important task. Making the EFI partition could boot by itself.
Right-click on the 1st EFI partition then click [Manage Flags] item of the popped-up context menu.
- Check [boot] item from the Flag-manage dialog box, to give the EFI partition the booting capability, then the [esp] item becomes checked automatically :

- All done!

Finally check if all have been done as intended then close the GParted Live via [GParted - Quit].
- Double-click on the reddish Exit icon on the GParted desktop screen to finish all up.
The user may choose Shutdown or Reboot here as she or he sees fit :

| Preparing A Bootable GParted USB stick << Previous | Next >> Installing Windows for dual-booting with Lubuntu |
No comments:
Post a Comment